Step-by-Step guide to a Re-engagement Campaign
Step-by-Step guide to a Re-engagement Campaign on any marketing automation platform.
Beyond just keeping your organization’s database clean, the ramifications of not having clean data can be felt by your finance team. According to research, businesses could be losing anywhere from 10-30% of their revenue on poor data. Your company’s poor data could be draining resources. But cleaning up your data is not as simple as asking people to update their information, or is it?
Many marketing automation software costs are based on emails you send or contacts in your database. If the emails you are sending aren’t even going to a valid email address, you’re not only wasting money, but also basing your research and trends on that bounced email address, which is the opposite of targeted marketing.
In this post, I want to demonstrate a step-by-step re-engagement campaign starting with how you should approach cleaning up your lead database.
Removing Duplicates
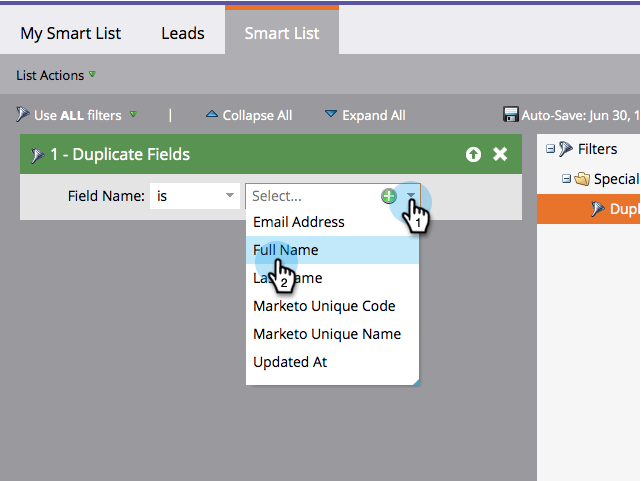
Now, normally the first step people would suggest in cleaning up a CRM is to check for duplicates. Nowadays it is really difficult to have duplicates of a contact in your database. If you aren’t already, be sure to match your prospect’s email to existing contacts in your database so you aren’t importing duplicates from the start. If you do have duplicates in your database, most software will allow you to merge contacts. Depending on how many contact duplicates you have, this will be the most intensive portion of your clean up process if there is not a batch edit function.
After you’ve identified duplicates and merged appropriately, you can create new lists or build your email campaigns from a specific segments. Some software will allow a search for inactive subscribers across all of your lits, others will only allow you to do it in specific list. Your segments or lists will consist of:
- Unsubscribes/Opted Out
- Bounced Emails
- Haven’t opened email
Unsubscribes/Opt Out Contacts
The unsubscribed/opted out list is easy to deal with; before you delete these contacts, be sure to export them into a csv. If anything funny should happen upon deletion you will have a backup file to save your butt. Your unsubscribes/opted out contacts may in fact be customers. If you have your marketing CRM synched with your sales CRM, deleting these contacts from the marketing side may alter their information on the sales side. BE CAREFUL.
Most email softwares also provides a reason as to why someone opts out if the contact answers the question. You can then see the reasons in an export. It’s a good practice to understand why people are opting out so you can use that information to create better future email campaigns.
Also, look for inconsistencies or spikes in your data around opt outs. Did you experience 10x the opt outs after your holiday campaign? What content was in the campaign or not in your campaign that would result in that many opt outs? Is it out of the ordinary of what you typically send? Ask questions until you have some potential explanations so you can incorporate that information when conducting future email campaigns.
Bounced Emails: Hard and Soft
Depending on the size of your “Bounced emails” list and if you can view the type of bounce (soft or hard) we suggest running your list through a data cleansing tool we use called Experian. This tool checks your list for valid email addresses and provides more clarity as to why an email hard or soft bounces. It returns your list with hard and soft bounced emails as well as valid email address. You can get a free trial for 500 email addresses and after that free trial it is $100/500 emails.
You will receive a csv with three columns:
- Do not email
- Soft Bounced (Mailbox is full (over quota). Recipient email server is down or offline. Email message is too large.)
- Hard Bounced (Recipient email address does not exist. Domain name does not exist. Recipient email server has completely blocked delivery.)
If your CRM allows you to see these without using Experian, even better! You will keep your soft bounced email addresses, and go through a re-engage campaign. Hard bounced email addresses should be removed from your database because keeping these emails in your database will only increase costs if you’re charged per contact and also affect your deliverability rates due to the email never getting through. Hard bounded emails will not get through because the domain name doesn’t exist or because the recipient is unknown. For example, the company you’re trying to reach is no longer in business or that employee no longer works there.
Contacts Who’ve Never Opened an Email
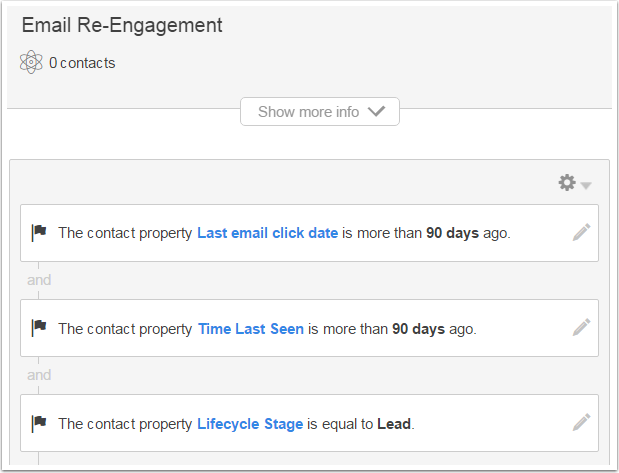
Identifying an accurate list of “Haven’t opened email” contacts should be based off of your company’s sales cycle. Each software is different in their ability to segment, so be as accurate as your software will allow. The general segment should be:
“Haven’t opened email in 90 days”
OR
“Campaign activity, did not open, any of the last 5 emails”.
In order to exclude new prospects from this list, be sure to add a date requirement for before your most recent campaign. For example, you don’t want to include someone who just signed up for your email campaigns within three months in a dynamic list to be removed from your database. You want to give them some time before they take no action and become inactive. Your list criteria might look like this:
- “Last Email Clicked Date=30 days” or
- “Last Email Opened = 90 days”, or
- “Date Added | is before | a specific date”(choose a date prior to a recent campaign/email send or list import).
 It is important to take your buying cycle into account when choosing the date you want to re-engage. You may have contacts that have not converted within 60 days, but your buying cycle maybe be 90.
What to Do Once Your Re-Engage Campaign List is Segmented Properly
Now you have your two lists (your unsubscribes have been removed already) ready for your re-engage campaign. A re-engage campaign does two things: it give your customers an easy way to engage with you again, and helps with your database clean up. In this email you should provide your contacts an easy way to unsubscribe, or update their preferences with an association to a persona.
After your send, wait two weeks and segment your email campaign into people who updated their preferences, people who did not open, and everyone else. Your contacts who updated their preferences re-engaged with you, and you were able to move them into a persona, which you now will be able to nurture with content that they actually want to see. People who did not open should be removed. Those that opened your email but did not engage should be treated cautiously and be in a list on their own. Keep these addresses for new product announcements, or other emails that may entice them to engage in the future with what information you currently know about their interests. You could keep them in a suppression list or could conduct a separate campaign all together just on this list.
After you have successfully cleaned up your database, you should either automatically be bumped to a low cost bracket or it’s time to warm up those negotiation tactics and see about getting a price reduction on your contract.
In Closing
Starting a re-engagement campaign is a great way to awaken stale contacts and clean up your system all in one. Be sure to have all the information before you begin one, or you could be removing/annoying your potential leads in the process.
Hope you enjoyed this step-by-step guide to re-engage your contacts.
Have you tried a re-engagement campaign before? Or are you wanting to start one? Let us know how you plan to do it or additional tips we can provide you! We’d love to hear from you.


